Friday, September 30, 2016

ZMODEM file transfer between Windows VM on VirtualBox and Linux

This is to show an alternative to transfer a file between host (Linux) and Windows XP running over VirtualBox on the same machine.


  1. On VirtualBox configuration, enable serial communication on port COM1, select "Host Pipe"  for Port Mode, and in "Path/Address" input box type "/tmp/WINCOM1".
  2. Start Windows VM
  3. From Windows VM, start Hyper Terminal, set speed to 115200 and no Flow control
  4. On Linux, open a terminal and type: sudo socat unix-connect /tmp/WINCOM1 TCP4-LISTEN:telnet
  5. To transfer file using ZMODEM, open another terminal and type: sz --tcp-client localhost:23 <file to transfer>


To connect to Windows' serial terminal, we simply telnet to localhost: telnet localhost, and amything we type on the telnet terminal will echo back on Windows' HyperTerminal and vice versa.
Thursday, September 22, 2016

Some VirtualBox Interesting internal features

As documented:

Usage: VBoxManage internalcommands <command> [command arguments]

Commands:

  loadmap <vmname|uuid> <symfile> <address> [module] [subtrahend] [segment]
      This will instruct DBGF to load the given map file
      during initialization.  (See also loadmap in the debugger.)

  loadsyms <vmname|uuid> <symfile> [delta] [module] [module address]
      This will instruct DBGF to load the given symbol file
      during initialization.

  sethduuid <filepath> [<uuid>]
       Assigns a new UUID to the given image file. This way, multiple copies
       of a container can be registered.

  sethdparentuuid <filepath> <uuid>
       Assigns a new parent UUID to the given image file.

  dumphdinfo <filepath>
       Prints information about the image at the given location.

  listpartitions -rawdisk <diskname>
       Lists all partitions on <diskname>.

  createrawvmdk -filename <filename> -rawdisk <diskname>
                [-partitions <list of partition numbers> [-mbr <filename>] ]
                [-relative]
       Creates a new VMDK image which gives access to an entire host disk (if
       the parameter -partitions is not specified) or some partitions of a
       host disk. If access to individual partitions is granted, then the
       parameter -mbr can be used to specify an alternative MBR to be used
       (the partitioning information in the MBR file is ignored).
       The diskname is on Linux e.g. /dev/sda, and on Windows e.g.
       \\.\PhysicalDrive0).
       On Linux or FreeBSD host the parameter -relative causes a VMDK file to
       be created which refers to individual partitions instead to the entire
       disk.
       The necessary partition numbers can be queried with
         VBoxManage internalcommands listpartitions

  renamevmdk -from <filename> -to <filename>
       Renames an existing VMDK image, including the base file and all its extents.

  converttoraw [-format <fileformat>] <filename> <outputfile>
       Convert image to raw, writing to file.

  converthd [-srcformat VDI|VMDK|VHD|RAW]
            [-dstformat VDI|VMDK|VHD|RAW]
            <inputfile> <outputfile>
       converts hard disk images between formats

  repairhd [-dry-run]
           [-format VDI|VMDK|VHD|...]
           <filename>
       Tries to repair corrupted disk images

  debuglog <vmname|uuid> [--enable|--disable] [--flags todo]
           [--groups todo] [--destinations todo]
       Controls debug logging.

  passwordhash <passsword>
       Generates a password hash.

  gueststats <vmname|uuid> [--interval <seconds>]
       Obtains and prints internal guest statistics.
       Sets the update interval if specified.

WARNING: This is a development tool and shall only be used to analyse
         problems. It is completely unsupported and will change in
         incompatible ways without warning.

I think some of the most useful ones are:
repairhd
converthd

So, if we want to convert Qemu's virtual-disk format (QCow) to VDI/VMDK/VHD, the steps are as follow (assume the qemu' image file is called home.qcow):

qemu-img convert -f qcow home.qcow -O raw home_raw.img
vboxmanage internalcommands converthd -srcformat RAW -dstformat VDI home_raw.img home.vdi

or
VBoxManage convertfromraw --format VDI home_raw.img home.vdi

Another interesting one, if we want to create and boot a virtual machine from a USB device.  Steps are:


  1. Verify which device the usb drive is attached to (e.g, /dev/sdd)
  2. Do:  VBoxManage internalcommands createrawvmdk -filename usb.vmdk  -rawdisk /dev/sdd
  3. Start VirtualBox and mount the file usb.vmdk in the storage (or, create a new Virtual Machine and attach the file usb.vmdk as the first storage)


Monday, September 19, 2016

Xamarin: The best way to develop Multi-platform Apps


Xamarin is a framework made by Microsoft to let developers to develop apps running natively on multiple platforms (Windows, iOS, Android).

The beauty about this framework SDK is enabling us to make apps running natively.  Our code is developed in C# (so for Windows we need to have Ms. Visual Stdio).  It uses native UI for its apps, so once we develop an app for Windows, for example, it's also compilable on Mac OS without code changes.  The same for Android.

The framework can be downloaded freely for Windows and MacOS:

https://www.xamarin.com/platform

Wednesday, September 14, 2016

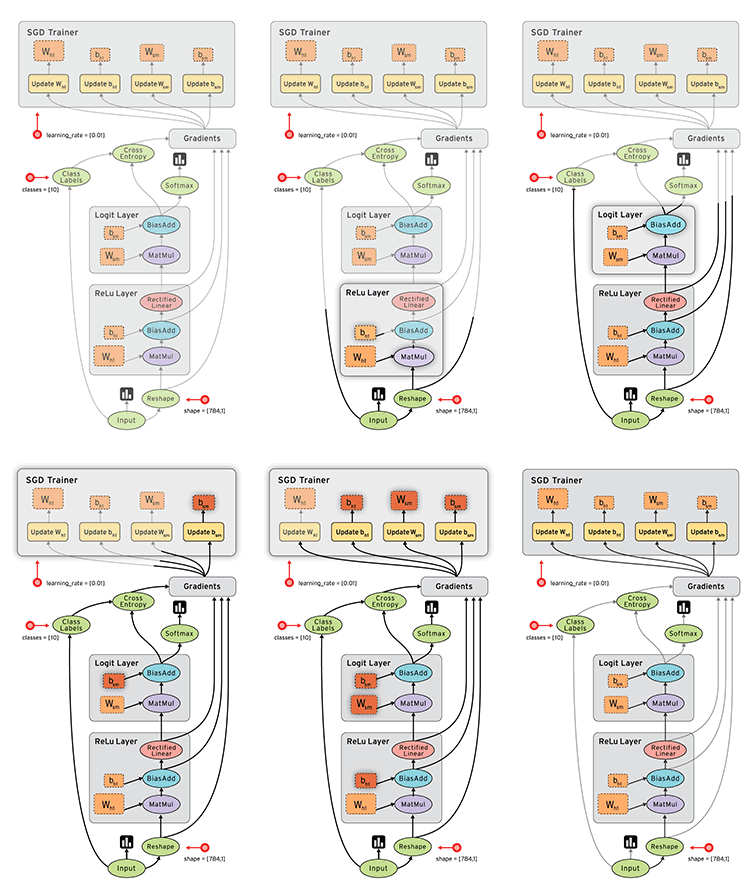
Distributed Machine Learning - Opensource Deep Neural Network

It is product of Google Research, now is available as Python framework for neural network based processing.

https://github.com/tensorflow/tensorflow

The cool thing about it is that it is able to utilize GPU(s) for its processing.

TensorFlow was originally developed by researchers and engineers working on the Google Brain Team within Google's Machine Intelligence research organization for the purposes of conducting machine learning and deep neural networks research, but the system is general enough to be applicable in a wide variety of other domains as well.


Tensors Flowing

Little more about tensor: https://en.wikipedia.org/wiki/Tensor


Monday, September 12, 2016

Wednesday, September 7, 2016

ATMEGA32 Kit


UPS on Linux

Install nut

The following example is for Tripp Lite UPS
Verify the Tripplite UPS:

# lsusb
Bus 002 Device 026: ID 09ae:2010 Tripp Lite 


Edit /lib/udev/rules.d/52-nut-usbups.rules and make sure the line below exists:

ATTR{idVendor}=="09ae", ATTR{idProduct}=="2010", MODE="664", GROUP="nut"

Reload the udev files:

udevadm control --reload-rules
My UPS definition in /etc/nut/ups.conf:

[tripplite_ups]
    driver = usbhid-ups
    port = auto
    vendorid= 09ae
    productid = 2010
    desc = "Tripp-Lite UPS"

(The library file is located in /lib/nut)

My /etc/nut/upsd.conf:
LISTEN 127.0.0.1        3493
LISTEN 192.168.25.168   3493
LISTEN 192.168.1.1      3493
LISTEN ::1              3493

Restart the driver:

$ sudo upsdrvctl start
Network UPS Tools - UPS driver controller 2.7.2
Network UPS Tools - Generic HID driver 0.38 (2.7.2)
USB communication driver 0.32
Using subdriver: TrippLite HID 0.81

If no error, that means everything is working fine.

My /etc/nut/upsd.users contains:

[upsmon]
    password = pass
    upsmon  master

My /etc/nut/upsmon.conf contains:

MONITOR tripplite_ups@localhost 1 upsmon pass master
SHUTDOWNCMD "/sbin/shutdown -h +0"
NOTIFYCMD /usr/local/bin/upsnotifyme
#NOTIFYFLAG ONLINE SYSLOG+WALL+EXEC
NOTIFYFLAG ONLINE SYSLOG+EXEC
NOTIFYFLAG ONBATT SYSLOG+WALL+EXEC
NOTIFYFLAG LOWBATT SYSLOG+WALL+EXEC
NOTIFYFLAG FSD    SYSLOG+WALL+EXEC
NOTIFYFLAG COMMOK SYSLOG+EXEC
NOTIFYFLAG COMMBAD SYSLOG+WALL+EXEC
NOTIFYFLAG SHUTDOWN SYSLOG+WALL+EXEC
NOTIFYFLAG REPLBATT SYSLOG+WALL+EXEC
NOTIFYFLAG NOCOMM SYSLOG+EXEC
NOTIFYFLAG NOPARENT SYSLOG

Restart the nut-server and client:

sudo service nut-server restart
OptiPlex-9020:/lib/udev/rules.d$ sudo service nut-client restart
                          
                                                                     
If it works, your PC can now communicate with UPS.